快速排序

2012年2月21日 12:38

#include <cstdio>
#include <cstdlib>
#include <ctime>

void swap(int &x, int &y) { int t=x; x=y; y=t; }
void check(int t[],int n)
{
    bool res=true;
    for(int i=0;res && i<n-1;i++)
        if(t[i]>t[i+1])
            res=false;
    if(res)
        puts("Yes");
    else
    {
        puts("No");
        for(int i=0;i<n;i++)
            printf("%d ",t[i]);
        puts("");
    }
}

//////////////////////////////////////////////////////

int partation(int a[], int l, int r,int pi)
{
    swap(a[r],a[pi]);
    int p=a[r],here=l,j;
    for(j=l;j<r;j++)
        if(a[j]<p)
            swap(a[here++],a[j]);
    swap(a[here],a[r]);
    return here;
}

void qsort1(int a[], int l, int r)
{
    if(l>=r) return;
    int p=partation(a,l,r,(l+r)/2);
    qsort1(a,l,p-1);
    qsort1(a,p+1,r);
}

//////////////////////////////////////////////////////

void qsort2(int a[],int l,int r)
{
    if(l>=r) return;
    int p=a[l],i=l,j=r+1;
    while(1)
    {
        while(a[++i]<p);
        while(a[--j]>p);
        if(i>=j) break;
        swap(a[i],a[j]);
    }
    swap(a[j],a[l]);
    qsort2(a,l,j-1);
    qsort2(a,j+1,r);
}

//////////////////////////////////////////////////////

void qsort3(int a[],int l,int r)
{
    if(l>=r) return;
    int i=l-1,j=r+1,p=a[(l+r)/2];
    while(1)
    {
        while(a[++i]<p);
        while(a[--j]>p);
        if(i>j) break;
        swap(a[i],a[j]);
    }
    qsort3(a,l,j);
    qsort3(a,i,r);
}

//////////////////////////////////////////////////////

const int n=10000;
int t[n];

int main()
{
    freopen("out","w",stdout);
    srand(time(NULL));
    for(int i=0;i<n;i++)
        t[i]=1+rand()%1000;
    qsort3(t,0,n-1);
    check(t,n);
    return 0;
}

评论(1) 阅读(1869)

python的闭包和装饰器

2011年12月06日 21:02

  • 闭包(closure)
>>> def F(name):
	def f():
		print name
	return f

>>> f1=F('f1')
>>> f2=F('f2')
>>> f1()
f1
>>> f2()
f2

F 是一个返回函数的函数。对于 F 产生的函数 f1、f2,其依赖于F的本地变量 name,但是在F执行结束后,函数 f1、f2 依然可以访问 name,而且相互独立。就像在返回内层函数时,把产生它的环境一块儿打包返回了,这种语法现象叫闭包(closure)。

在《Programming in Lua 2nd》里展示了闭包的各种绚丽的用法,感觉 lua 把闭包和元编程用到极致了。即使不打算用 lua,也强烈推荐读一读,对了解 python 和其他动态语言的本质和实现或有帮助。

在 lua 中有这样一种写法:

>> function gen_ins(init) 
..   local i=init-1 
..   return function() i=i+1; return i end 
.. end
>> ins5=gen_ins(5)
>> ins2=gen_ins(2)
>> ins5()
=> 5
>> ins2()
=> 2

但是这在 python 中却行不通:

>>> def gen_ins(init):
	i=init-1
	def ins():
		i=i+1
		return i
	return ins

>>> ins0=gen_ins(0)
>>> ins0()

Traceback (most recent call last):
  File "<pyshell#111>", line 1, in <module>
    ins0()
  File "<pyshell#108>", line 4, in ins
    i=i+1
UnboundLocalError: local variable 'i' referenced before assignment

这就是所谓的 python 不支持真闭包,python 中对外层变量不能赋值。一般在 python 的函数中,变量的查找顺序是局部符号表,全局符号表,内置符号表。我们知道,全局变量可以被引用,但是要赋值的话,必须用 global 声明一下,否则其实是新建了一个本地变量。从python解释器的角度看,“i=i+1”中 i 既然被赋值,就应该当做本地变量,所以就会发生上述 UnboundLocalError 错误。i 也并不是全局变量,所以在 ins 中用 global 声明了 i 则会找不到全局变量。按照 PEP3104 来看,这是一个由来已久的问题。

PEP3104 中提到一种解决办法如下:

>>> def gen_ins(init):
	class T: pass
	t=T()
	t.i=init-1
	def ins():
		t.i=t.i+1
		return t.i
	return ins

>>> ins0=gen_ins(0)
>>> ins0()
0

称为"wrapping it in a mutable object",看起来很诡异。因为Guido觉得不能改动关键字 global 的含义,所以在 python 3 中引入了 nonlocal 关键字,总算解决了这个问题。


  • 装饰器(decorators)

前面的闭包算是装饰器的引子了。装饰器有两种形式:

@A
def foo():
    pass

相当于:

def foo():
    pass
foo = A(foo)

而:

@A(arg)
def foo():
    pass

则相当于:

def foo():
    pass
foo = A(arg)(foo)

可以看出第一种的装饰器是个返回函数的函数,第二种的装饰器是个返回 返回函数的函数 的函数。两种装饰器的简单示例:

def A(func):
    def newfunc(*args, **argkw):
        print 'A'
        return func(*args, **argkw)
    return newfunc

def A(arg):
    def _A(func):
        def newfunc(*args, **argkw):
            print arg
            return func(*args, **argkw)
        return newfunc
    return _A

装饰器中的嵌套定义的函数就涉及到 python 中闭包的问题。

装饰器可以做很多事,比如在原函数调用前检查参数,或者检查登陆状态,调用后记录日志什么的。python 中默认有 staticmethod 和 classmethod 两个装饰器。

staticmethod用来声明类的静态方法,这样调用时就不会传入实例对象(self):

>>> class T:
    name = 'T'
    @staticmethod
    def getname():
        print T.name

        
>>> T.getname()
T

classmethod 修饰那些直接以类对象作为参数的方法:

>>> class T:
    name = 'T'
    @classmethod
    def getname(a_class): print a_class.name

    
>>> T.getname()
T

其实更”正常“的是不用装饰器:

>>> def getname(a_class): print a_class.name

>>> class T:
    name = 'T'
    getname = classmethod(getname)

    
>>> T.getname()
T

评论(4) 阅读(5269)

用机器学习过滤微博

2011年12月01日 14:52

@自扯自蛋的写的扯经系列很有意思。作者的博客有早期的扯经的合集。为了看扯经有段时间还天天翻新浪微博。不过后来看不到扯经更新了,以为是作者不写了,直到有一天,作者说在网易微博上还在写!这不是坑爹吗!!!害我追了大半天,结果在别的地方开坑了!总不能又翻一遍网易微博,在作者的碎碎念中找一个个扯经吧,所以一直想把网易微博上的扯经过滤出来。最近一直在做 Stanford 的在线的 Machine Learning 课程 programming exercise 6 中给出了如何用支持向量机(support vector machine,SVM)来过滤垃圾邮件的例子,这不正好用上了,遂有此文,是以为记。

首先要得到作者的所有3560条微博,想用 api 爬,结果发现这也需要 oauth 登录。使用 oauth.net/code/ 上推荐的库 python-oauth2 没成功。直接上网易微博自己的 python 库 t4py 。按照说明改 t4py\tblog\constants.py 里的 CONSUMER_KEY 和 CONSUMER_SECRET 以及 在ACCESS_TOKEN_FILE 所指的文件中加上自己的名字,Acess token 和 Acess token secret。

按照 example 写了这样一个脚本得到自扯自蛋的所有微博:

# -*- coding: utf-8 -*-

import json

from t4py.tblog.tblog import TBlog
from t4py.tblog.constants import CONSUMER_KEY
from t4py.tblog.constants import CONSUMER_SECRET
from t4py.http.oauth import OAuthToken
from t4py.utils.token_util import TokenUtil

util = TokenUtil()
str = util.get_token_str('scturtle')
t = TBlog(CONSUMER_KEY, CONSUMER_SECRET)
t._request_handler.access_token = OAuthToken.from_string(str)

all=[]
last_id=None

tweets = t.statuses_user_timeline({'name':'自扯自蛋','count':200,'trim_user':'true'})
tweets = json.read(tweets)
for i in tweets:
    all.append(i['text'])
print 'So far:',len(all)
last_id = tweets[-1]['cursor_id']

for page in range(20):
    tweets = t.statuses_user_timeline({'name':'自扯自蛋','count':200,'trim_user':'true', 'since_id':last_id})
    tweets = json.read(tweets)
    try:
        for i in tweets:
            all.append(i['text'])
    except:
        print 'error:',tweets
        break
    print 'So far:',len(all)
    if len(tweets) == 0:
        break
    last_id = tweets[-1]['cursor_id']

print 'Got:',len(all)
with file('alltweets.txt','w') as f:
    f.write(json.write(all))

print 'Done!'

在网易的库里发现一个简单的 json 库,很好用,下面就用它而不是 python 自带的库了。

然后该提取 features 了。个人考虑,重要关键字基本上都是两个字的,比如“扯经”,“小北”,“师父”等等。于是就把所有微博按两个字一词地统计了一下词频。

dicts={}

for t in tweets:
    for i in range(len(t)-1):
        dicts[t[i:i+2]]=dicts.get(t[i:i+2],0)+1

看了一下,想要的关键词差不多都包含在前200个词里面,于是没有继续筛选,直接上前200个词作为 features。

接着该找 training set 和 test set 。从所有微博中 sample 出300个来,80%作为 training set ,20%作为 test set 。training set 和 test set 都要按照 features 转化成01向量,即微博中有某 feature 则对应向量中的哪一位为1否则为0。同时还写了个脚本人工判断结果,否则就不能 train 和 test 了。

res = [ [t,[],0] for t in tset ]

for i,r in enumerate(res):
    print 'Training set:',i
    print '<<',r[0].decode('utf8') ,'>>'
    res[i][1]=map(lambda f: 1 if f[0] in r[0] else 0, features)
    ans = raw_input('Yes? ')
    res[i][2]=1 if ans else 0

接着就是 octave 的戏份了。调用 exercise 中提供的 octave 脚本(用到的有svmTrain.m, linearKernel.m 和 svmPredict.m)训练和预测就可以了。

%% Initialization
clear ; close all; clc

fprintf('Loading training set and test set ...\n');

allX = load('t_x.mat');
ally = load('t_y.mat');

m=length(ally);

training_percent = 0.8;

X = allX(1:ceil(m * training_percent),:);
y = ally(1:ceil(m * training_percent),:);

Xtest = allX(ceil(m * training_percent):end,:);
ytest = ally(ceil(m * training_percent):end,:);

C = 0.1;

% training set 
model = svmTrain(X, y, C, @linearKernel);

p = svmPredict(model, X);
fprintf('Training Accuracy: %f\n', mean(double(p == y)) * 100);

fprintf('Program paused. Press enter to continue.\n');
pause;

% test set
p = svmPredict(model, Xtest);
fprintf('Test Accuracy: %f\n', mean(double(p == ytest)) * 100);

fprintf('Program paused. Press enter to continue.\n');
pause;

% sort and save features
fprintf('Sorting features ...\n');
[weight, idx] = sort(model.w, 'descend');

fprintf('Saving features ...\n');
out = fopen('feature.json','w');
fprintf(out,'[ %d',idx(1));
for i=2:length(idx),
	fprintf(out,', %d',idx(i));
end
fprintf(out,']');
fclose(out);

fprintf('Program paused. Press enter to continue.\n');
pause;

% predict all
fprintf('Predict for all ...\n');

Xall = load('all_x.mat');
p = svmPredict(model, Xall);

% to json
out = fopen('predict.json','w');
fprintf(out,'[%d',p(1));
for i=2:length(p),
	fprintf(out,', %d',p(i));
end
fprintf(out,']');
fclose(out);

fprintf('Done! Press enter to exit.\n')
pause;

结果按 json 格式保存出来再用 python 处理一下即可。

训练中可以看到 training set 和 test set 的准确率都达到了惊人的100%。打印出权重最高的几个 feature 可以看到符合预期,包含了“扯经”,#号,【】号,“小北”,“师父”等重要关键字:

扯经
#扯
小北
 #
】【
?】
】
已经
师父
【师
怎么
,一
,就
。】

分类后的微博也非常理想。扯经类里一溜儿的扯经。搜索非扯经类里,没有“小北”,含“师父”的一条并不是扯经,有几个含“扯经”的扯经没有分对,但是也有几个含“扯经”的确实只是一些讨论。总体效果很理想。

总结一下,python 很给力,无论是网络部分还是字符串处理部分,要是会 numpy 和 scipy 的话说不定 octave 的部分也能包办了。ML 课程的练习质量很高,既提供了很多好思路又提供了一些实际可用的脚本,不会让人上完课后还感到无从下手。还有在脚本之间用 json 格式的文件传递信息真的是非常的方便啊。
评论(0) 阅读(3212)

粒子群优化算法演示

2011年11月12日 19:14

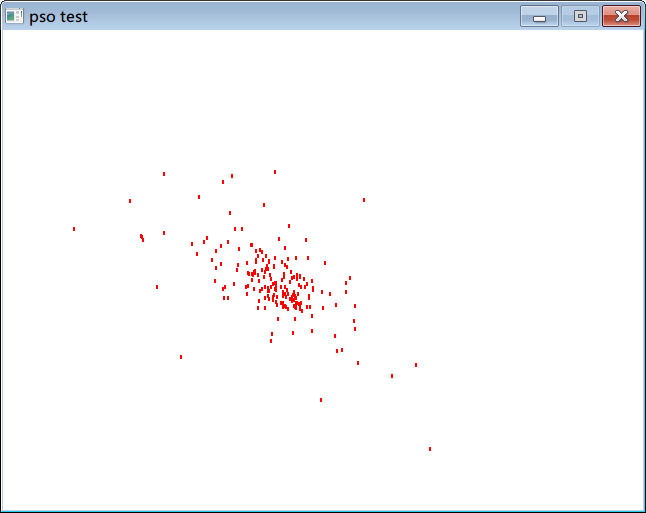
话说想写这个好久了,看大牛做过,直到昨天在twitter上看到有人在iPad上用Codify(Codea)实现了,确实好玩,这才随便找了点资料开工。

算法意想之外的简单,模拟鸟群的行动,每个鸟根据离目标最近的那个鸟的位置调整自己的方向。实现的效果是点追随鼠标汇聚。效果没有意想中的那么好,不知是不是有bug,参数设置的不好的时候不能汇聚或者其他诡异行为,╮(╯_╰)╭。

update at 2011.11.13:设置了最小最大速率参数后,果然效果好多了

代码很简单:

# coding: utf-8

import pygame
from pygame.locals import *
from myvector import Vector, distance # 向量类
from random import random

pygame.init()
SIZE=(640, 480)
screen = pygame.display.set_mode(SIZE)
pygame.display.set_caption('pso test')
clock = pygame.time.Clock()
FPS = 60     # 帧率
speed = 0.1  # 调整速度
w = 0.7      # 惯性权重
c1 = c2 = 2  # 学习因子
minv = 10    # 最小速度
maxv = 50    # 最大速度

def sig(x): return x/abs(x)

#======================================================#
class Bird:
    def __init__(self):
        self.v=Vector(random()-0.5,random()-0.5)
        self.pos=Vector(SIZE[0]*random(),SIZE[1]*random())
        self.bestpos=self.pos
    
    def update(self, dt, mpos, gbestpos):
        global speed,w,c1,c2,minv,maxv

        # 更新速度和位置的公式
        self.v = self.v*w + ((self.bestpos-self.pos)*random()*c1 +\
                                 (gbestpos-self.pos)*random()*c2)

        # 限制最小最大速度
        self.v = Vector(sig(self.v[0]) * max(abs(self.v[0]), minv),\
                        sig(self.v[1]) * max(abs(self.v[1]), minv))
        self.v = Vector(sig(self.v[0]) * min(abs(self.v[0]), maxv),\
                        sig(self.v[1]) * min(abs(self.v[1]), maxv))

        # 更新位置
        self.pos += self.v * speed * dt /(1000.0/FPS)

        # 更新个体最优位置
        if distance(self.pos, mpos) < distance(self.bestpos, mpos):
            self.bestpos = self.pos

    def paint(self,screen):
        pygame.draw.circle(screen,(255,0,0), map(int,self.pos), 2)
#======================================================#

birds=[ Bird() for i in xrange(200)]

pygame.event.set_allowed([QUIT])
while True:
    for event in pygame.event.get():
        if event.type == QUIT:
            exit()

    dt = clock.tick(FPS)
    # 目标位置
    mpos = pygame.mouse.get_pos()
    mpos = Vector(*mpos)

    # 更新种群最优位置
    gbestpos = min(birds,key=lambda b: distance(b.pos,mpos)).pos

    screen.fill((255, 255, 255))
    # 更新每个个体
    for b in birds:
        b.update(dt ,mpos, gbestpos)
        b.paint(screen)
    pygame.display.update()

为了实现方便的写的向量类:

class Vector:
    def __init__(self,x=0,y=0):
        self.val=[float(x),float(y)]

    def __getitem__(self,key):
        return self.val[key]

    def __setitem__(self,key,value):
        self.val[key]=value

    def __str__(self):
        return '('+str(self[0])+', '+str(self[1])+')'

    def __add__(self,v):
        return Vector(self[0]+v[0],self[1]+v[1])

    def __sub__(self,v):
        return Vector(self[0]-v[0],self[1]-v[1])

    def __div__(self,n):
        return Vector(self[0]/n,self[1]/n)

    def __mul__(self,n):
        return Vector(self[0]*n,self[1]*n)

    def __iadd__(self,v):
        self[0]+=v[0]
        self[1]+=v[1]
        return self

    def __isub__(self,v):
        self[0]-=v[0]
        self[1]-=v[1]
        return self

    def __idiv__(self,n):
        self[0]/=n
        self[1]/=n
        return self

    def __imul__(self,n):
        self[0]*=n
        self[1]*=n
        return self

def distance(v1,v2):
    return ((v1[0]-v2[0])*(v1[0]-v2[0]) +\
            (v1[1]-v2[1])*(v1[1]-v2[1]))

if __name__ == '__main__':
    v1=Vector(1,2)
    v2=Vector(2,1)
    print v1+v2

评论(0) 阅读(3649)

pygame实现文本转图片

2011年11月12日 13:35

渣浪微博上随处可见把大段的文字转成图片发布的。一直以为需要PIL才能实现,今天看到pygame也有这种功能,而且还很简单,看例子:

# coding: utf-8

import pygame
pygame.init()

# 所有可用系统字体
# print pygame.font.get_fonts()

# 字体名, 大小
font = pygame.font.SysFont('microsoftyahei', 16)

# 字儿们, 是否开反锯齿, 前景色, 背景色 
text1 = font.render(u'根据相关法律', True, (0,0,0), (255,255,255))
pygame.image.save(text1, 'text1.jpg')

# 带透明的话不设背景色
text2 = font.render(u'此页无法显示', True, (0,0,0))
pygame.image.save(text2, 'text2.png')

# 组合
w, h = text1.get_size()
surface = pygame.Surface((w, 2*h))
surface.fill((255, 255, 255)) # 因为默认背景黑
surface.blit(text1, (0, 0))
surface.blit(text2, (0, h))
pygame.image.save(surface, 'all.png')

学习自: 用Python和Pygame写游戏-从入门到精通(4)

还可参考这个使用PIL的例子: Python: 纯文本转PNG

评论(0) 阅读(3531)